
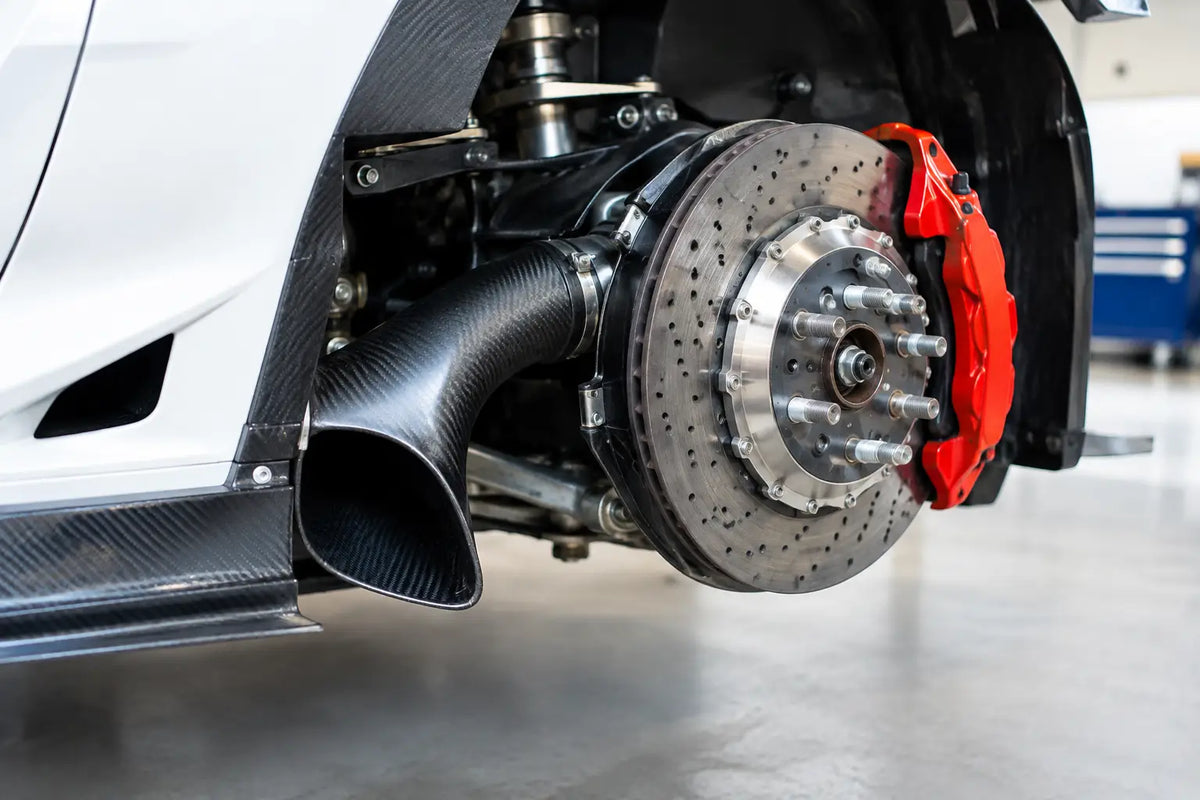
The first warning is usually a long pedal near the end of a session, followed by a hot-pad smell in the pits and a set of front discs wearing harder than they should. More aggressive pads and high-temperature fluid help, but airflow is often the missing piece. This brake ducting setup guide shows how to send cool air to the right part of the brake system without building a fragile, restrictive or poorly aimed setup.
Brake ducts are not a styling mod. On a hard-driven track car, they can reduce peak component temperature, stabilise pedal feel and extend the life of pads, discs, seals and wheel bearings. They are especially worthwhile on heavier road cars, turbocharged builds, cars on sticky tyres, and platforms that have gained speed before receiving a serious brake upgrade.
Start with the real overheating problem
Do not fit ducting simply because the car has track wheels and a splitter. First work out what is actually getting too hot. Pad fade, fluid boil, disc cracking, tapered pad wear, blueing discs and cooked wheel-bearing grease can look related, but they do not always have the same fix.
If the pedal becomes long but returns after cooling, brake fluid may be reaching its limit. If pedal pressure stays firm but stopping power falls away, the pad compound could be outside its operating range. A pad that crumbles at the leading edge or wears much faster on the inner side may point to caliper condition, poor pad support or an airflow imbalance rather than a general lack of cooling.
Ducting is most effective when the disc is the heat exchanger. The goal is to feed the internal vanes with cool, pressurised air so the rotating disc pumps that air through itself. Blasting air at the outer disc face can offer some benefit, but it is less efficient and may create uneven thermal loading. Before buying parts, inspect the disc design, caliper position, wheel clearance and existing underbody airflow.
Brake ducting setup guide: plan the airflow path
A good system has four jobs: collect air from a high-pressure area, carry it with minimal restriction, keep the hose clear of moving or hot components, and discharge it close to the disc centre. Every compromise in that route affects the result.
Choose an intake that can actually feed the hose
The front bumper is the obvious location, but not every opening works. An intake needs a clean source of air and enough frontal area to support the hose diameter. A duct mounted behind a fog-light blanking plate or beside a grille opening can work well, provided the bumper structure does not choke it immediately behind the visible opening.
Avoid placing the inlet where it collects tyre wake, road debris or radiator exit air. Hot air from the engine bay is no use to a brake cooling system. On many cars, a purpose-made bumper inlet or neatly fabricated scoop behind a grille is the cleanest answer. A scoop under the front splitter can work, but it needs protection from kerbs, standing water and loose circuit debris.
For most track-day applications, 63 mm or 76 mm hose is a realistic starting point. A 51 mm hose may be easier to package but can be restrictive on a heavy, fast car. Going straight to a huge hose is not automatically better either. If the inlet, backing plate or wheel clearance forces several tight reductions, the larger hose adds bulk without delivering the expected flow.
Keep the route short, smooth and protected
Flexible high-temperature brake duct hose is designed to move, but it is not indestructible. Route it as directly as possible from intake to backing plate, avoiding sharp bends, crushed sections and unnecessary length. A smooth sweeping bend flows better than a tightly folded hose, even if both technically reach the same point.
The difficult area is normally behind the wheel. Turn the steering from lock to lock with the suspension loaded if possible, then check clearance at full bump and full droop. A hose that looks perfect with the car on axle stands can rub through on the first compression zone or when the tyre deflects under cornering load.
Keep it away from the tyre, driveshaft, anti-roll bar, damper body and exhaust. Use secure mounts and heat shielding where needed, but do not clamp the hose so tightly that it collapses or splits. Leave enough controlled movement for steering and suspension travel. Cable ties alone are rarely a permanent motorsport solution near heat and abrasion; use proper brackets, P-clips or fabricated tabs where the installation demands it.
Aim for the disc hat and vane entrance
The backing plate is where an average ducting installation becomes a proper cooling system. Its outlet should direct airflow towards the disc hat and the entrances to the internal cooling vanes. That lets the disc do what it was designed to do: pull air through the rotor and reject heat as it spins.
A full backing plate is not always necessary, and a badly shaped one can trap heat around the disc. The best design usually shields the rear of the disc from turbulent wheel-well air while presenting a shaped outlet near the disc centre. It must also clear the caliper, wheel barrel, suspension joints and disc at every steering angle.
Do not point the hose directly at the caliper piston seals. Calipers benefit indirectly when disc temperatures are under control, but concentrated airflow at one small area does little for the rotor and can produce uneven temperature gradients. Target the disc first.
Match the hardware to the car’s duty cycle
A 1,100 kg naturally aspirated hatchback on occasional track days has different needs from a 1,700 kg turbocharged saloon running repeated 20-minute sessions. Brake ducting should match vehicle mass, speed, tyre grip, circuit layout and driver pace.
Cars with factory front undertrays and sealed wheel arch liners may need more fabrication, but those panels can also help contain airflow once modified correctly. Cars with very open front ends may have plenty of apparent airflow yet still need a defined inlet and backing plate to get air into the disc rather than around it.
Wheel choice matters too. Some wheel designs evacuate heat well; others create a stagnant pocket around the caliper. Measure wheel-barrel clearance before committing to a backing plate. Big brake kits, wider tyres and aggressive offsets can quickly consume the space that a duct outlet needs.
The core parts of a durable installation are straightforward:
- High-temperature, abrasion-resistant hose in a sensible diameter
- Secure bumper or grille inlets with a clear path behind them
- Vehicle-specific or fabricated backing plates aimed at the disc centre
- Brackets, P-clips and heat protection suited to suspension movement
Do not use ducting to hide a weak brake package
Cooling cannot make an unsuitable pad compound suitable for repeated heavy braking, and it cannot correct seized slider pins, worn piston seals or poor brake balance. Service the system before adding airflow. Fresh fluid with the right boiling point, properly bedded pads, healthy discs and sound calipers are the baseline.
It also pays to check brake bias before chasing front cooling alone. Most front-heavy cars work the front axle much harder, so front ducts are usually the priority. But if rear brakes are contributing very little because of a mechanical issue, proportioning setup or electronic intervention, the front system will always be overloaded.
Record what changes. At a minimum, note ambient temperature, circuit, session length, pad condition and pedal behaviour. Temperature paint on disc edges can provide useful direction, while a pyrometer reading taken immediately after a session offers better detail. The objective is not the lowest possible number. It is repeatable temperatures within the operating window of the pad, fluid and disc.
Test it before the next full-send session
Once fitted, inspect the system after every early outing. Look for shiny rub marks on the hose, witness marks on the tyre, loose brackets, melted sections and backing-plate contact. Check with the steering on full lock, not just straight ahead. If the car runs kerbs aggressively, inspect after a session where the suspension has seen real travel.
Pay attention to wet-weather use as well. A large low-mounted inlet can ingest spray, grit and small stones. A mesh guard can protect the duct, although overly fine mesh becomes a restriction and needs regular cleaning. The same applies to leaves, rubber marbles and debris picked up in pit lanes.
Brake cooling rewards careful work. Build the route around clean air, keep the hose alive through full suspension movement, and feed the disc vanes rather than the caliper face. Get those fundamentals right and your next pad choice, fluid change and late-braking confidence will have a far better foundation.